Saturday, 2 June 2012

Set Up a Facebook Email Address

| |
0 comments


Facebook is a well-known social network with over 800 million users. People use Facebook to connect and share with their friends, family and followers from any part of the world. Most probably now you may familiar with Facebook and it's most of unique functionalities. Facebook is giving out and adding more and more user friendly features to improve user experience of their members. So you may find that Facebook is a great place to find and connect with your friends online. However what if a non-Facebook member wants to reach you quickly? Absolutely they can send you an email. But do you always awaiting for emails or check emails right after you got them? I hope you would say 'No'. But what if you can receive or respond to email while you are on Facebook?

Facebook now offers their own email service which is optional, to all Facebook members and it enable people to interact directly with you even they have no Facebook account. Eventhough it acts as a traditional email service, it's always connected with your Facebook profile. If someone sends you an email to your Facebook email, it will shown up in your Facebook messages with the notification of new email or message. And if you reply to this email, it will send directly to their inbox and it's formatted as a message on Facebook which includes your profile picture and public name. Your Facebook email address starts with your public username and it will followed by @facebook.com domain name. So if you are a Facebook lover, you would definitely love to have your own Facebook email address.

Before You Go:

Before you claim a Facebook email, you should have a Facebook username for your profile. If you don't have a Facebook username, read How to Claim a Username in Facebook.


Steps:

1. Sign in to Facebook.

2. Navigate to your Facebook Messages.

3. Click on the Claim your Facebook email link you find on top of the page.

4. Now you will see a pop up box with your profile URL including your username and the Facebook email you gonna claim. Click Activate Email button.

Note: If you still unable to create a username for your Facebook profile, it will prompt to create a Facebook username before you have a Facebook email address.


5. Now you have successfully set up your Facebook email address. All your incoming emails from external parties and bulk emails will be moved to Other folder. And spam email swill be hidden from you.
Read More

Change Email Associated with Your Facebook Account

| |
0 comments


When you create or sign up for a Facebook account, you need to provide your email address in the sign up process. It is the unique identifier of your account and further Facebook uses your email address to communicate with you and to send you preferred notifications as when it happens on your profile. However once you signed up for a Facebook account with your current email, you won't be able to use same email address to create another account on Facebook. However creating two Facebook accounts for same person may seems unfair. In some scenarios you may wanna delete your current account permanently to build up another Facebook account. But still you have to wait 30 days more from request, until it gets deleted permanently. Apart from that you may just wanna get rid of old email or you may wanna associate new email account as you have no more access to your older one. In such situations you may wanna change existing email associated with your Facebook account. Isn't it?

Facebook allows you to change your current email address without deleting your Facebook account. It's really convenient in the sense of preserving your data on Facebook account and you won't miss your friends or followers just because you have no access to your email account. If you have no access to your current email account anymore, Facebook let you associate new email without dealing with your old email address. Also if you wish to create a new Facebook account after deleting current one, but with same email address, you need to change email addrss associated with your current account before you create a new one. However as your requirement, here you can find how to change associated email of your Facebook account.

Steps:

1. Sign in to Facebook and navigate to Account Settings page.

2. Click Edit link correspond to Email setting.

3. Now click Add another email link.

4. You will be able to see a new text box with the label New Email. Enter your new email in that field.

5. Before save changes, enter your Facebook password in Password field.

6. Click Save Changes button.

7. Now navigate to your new email account and you will able to see a verification email from Facebook. Confirm your email by clicking on the link in that email.

Note: If you didn't get any Confirmation email you can resend it  from Email setting tab.

8. Once after confirmation, you will be directed to Account Settings page again. Click Edit link next to Email to select your new email as the primary email for your Facebook account.

9. Now choose your new email address from list of emails listed in Choose Primary option.

10. Enter your password in Password field and click Save Changes button.

Notes:

* If you wish to use your old email associated with existing account to sign up for another account on Facebook, then you need to remove it from your current account.

Remove an Email Associated with Your Facebook Account

i. Navigate to Account Settings page.

ii. Click Edit link correspond to Email.

iii. Click Remove link next to your old email address.

Note: You can't remove primary email associated with your Facebook account.

iv. Enter your password in Password field and Save Changes.


* Unless you remove your old email from your Facebook account, you can use any of associated email addresses to login to your Facebook account.
Read More

Change Your Twitter Background Image and Colors

| |
0 comments


As you know Twitter is a powerful social media platform to gain users' attention and to build up powerful communities around you. It can be used as a personal profile or else you can use it for business purposes to promote your brand or organization. So specially if you are using it for business, you gotta impress your Twitter profile visitors in their first sight. But have you ever feel tasteless whenever you look upon your Twitter profile? Oh yeah? Then why don't you customize it with your creativity and magical colors?

What do you know about Twitter and what does it allows you to do? You will find out that Twitter has a unique feature unlike other social networks such as Facebook, Google+. It is the profile customization. Twitter allows you to customize your profile design and colors suite to your preferences and also provide you predefined themes to use on your profile. So you will really like that if you are bored with typical design and colors seen on your  Twitter profile. Now what? What are you waiting for? Let's go get your Twitter profile customized.

Steps:

1. Sign in to your Twitter account. 

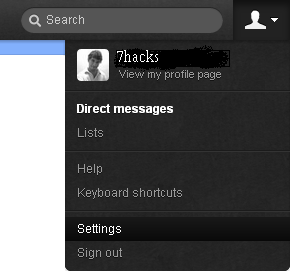
2. Click on your user icon on top pane and select Settings from the drop down menu.


3. Navigate to Design tab.

4. Now find your preferred theme from available themes and click on it.

Note: You can see instant preview of theme right after you select one and it doesn't save until you save changes.


How to Change Background Image

i. Click on Change background image button.

ii. Here either you can select theme default background image or no background at all. Further if you wanna use custom background image, upload a custom background image via Choose File button.

Note: Your custom image should be one of this file types - GIF, JPG, PNG. And make sure your image is less than 800 kilobytes.


iii. Once you upload image, you can use tile background option to display your background as tiles.

iv. Now click Save Changes button.


How to Change Design Colors

i. Click on Change design colors button.

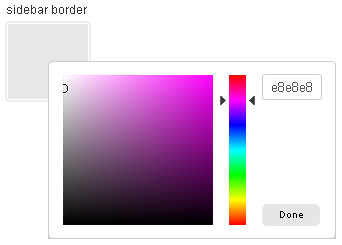
ii. Now you can see respective colors for each element including text, links, sidebar. Select a color by clicking on respective color boxes and click Done when you are finished.


iii. Now click Save Changes button.
Read More

Transform Your Facebook Profile or Page into a Movie with Timeline Movie Maker

| |
0 comments


Why do you use Facebook? Simply, Facebook is to get connected with your friends and family online to share stuff that matters. You can share photos, videos, events of your life and it's like being in a party and broadcasting your messages. Ohw... Not only your friends and family, but also you can engage with your customers and fans through Facebook business pages. You can always share stuff that matters to your brand and interact with your fans easily. Absolutely, it's the best way to maximize your reach if you're talking about businesses. While being connected with your friends and fans around the world, you always tend to share photos or videos and add events on your timeline. Over time they will get buried. Do you mind doing sort of a recap and go through your historic moments again?

Does It Matters?

No... no... Here we are not aware of security or your historic data on timeline. It's about showing off your sweet moments with your friends and family. Isn't it cool and fun? They will love to see them again. isn't it? When it comes to your business, it would be fascinating to your fans too. Your new fans will never know about your brand and they won't go to the start of your fan page timeline to see what happened in early days. If you can do a recap again, they will get to know more about your brand or business too. Hmmm.... But you have to go through each event and moments you had and it's really time consuming unless you joined Facebook recently or not sharing much on it. What if an application can do it all for you? - A timelinevideo which includes all your sweet memories on timeline. Excited?


What is a Timeline Video?

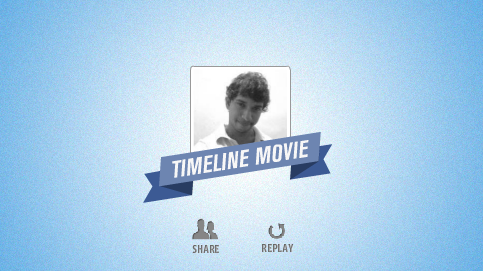
Timeline video (we can call it a movie too) is not a introduction video or something about timeline you need to share with your Facebook friends and fans. It's all about your Facebook profile or page timeline. As you share photos and videos of special events that takes place in your life journey or which matters to your brand on Facebook, this application will able to dig more deep into your timeline and capture historic sweet memories. It will analyze your Facebook timeline and come up with a video that walk through your special events, memories with awesome photos you have shared on your Facebook timeline. No matter it's your profile or page timeline, it will create a movie for you based on events, images and videos you have shared with your friends and fans. It's a collaborative project of Facebook and Definition 6. It would be an awesome visual experience and it takes you all over your Facebook timeline. Your friends and fans will definitely love it. Would you love to try it out for yourself?


Visit this link & follow the steps below


http://www.timelinemoviemaker.com


Steps:

1. If you wanna create a video for your Facebook profile, navigate to Timeline Movie Makerwebsite. Else if you wanna create a video for your Facebook page, go to Timeline Movie Maker for Pages page.

2. Now click Make Your Movie button to continue.


3. You will need to authorize the application to access your Facebook profile to grab your historical moments and events. Click Allow to authorize.

Note: If you are creating video for Facebook pages and administering multiple pages, you have to select which page you wanna select for the video.

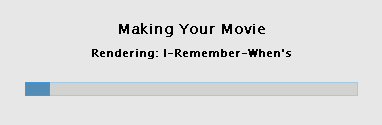
4. The application will start to run through your timeline and create movie for your profile or page.


Note: To make a movie, you should have at least 50 photos that you've shared with friends or public.

5. Once after creating your movie, it will start playing it for you.

6. At the end of your movie, it will let you share instantly or customize your created movie. If you wanna customize it, you can change default soundtrack and also able to replace images it has been selected to use with the movie with your existing images in Facebook albums.


Enjoy :-)

Read More

AUTO HIDE IP FULL----

| |
0 comments
Did you know, your IP address is exposed every time you visit a website? Your IP address is your online identity and could be used by hackers to break into your computer, steal personal information, or commit other crimes against you. Auto Hide IP allows you to surf anonymously, change your IP address, prevent identity theft, and guard against hacker intrusions, all with the click of a button. Auto Hide IP is privacy-protection software which enables you to conceal your real IP address, surf anonymously, and automatically change your IP address every few minutes.

With it, you can select fake IP from different countries via “Choose IP Country” option and can Check IP directly. Using it, you are able to conceal your identity online by showing them a fake IP, blocking hackers and prying eyes from knowing your true location or identity. You can also choose “Launch on Startup” and then it will run and load a fake IP automatically when you log on to Windows. Besides, you can easily switch between fake IP and real IP by simply clicking a button of Hide IP or Stop Hide.

Auto Hide IP works with Internet Explorer, Firefox, Opera, Maxthon, MyIE and is compatible with all types of routers, firewalls, home networks, wireless networks and any other kind of Internet.

Anonymous Web Surfing
Prevent others from seeing your true IP when browsing the Internet. Change your IP frequently with the click of a button!

Protect Your Identity
Identity thieves can use your IP address to monitor your web activity and intercept your private financial information. Criminals, hackers, and even the government can trace your exact location right down to your street address.

Choose IP Country
You can also select fake IP from different countries via “Choose IP Country” option and can Check IP directly.

Send Anonymous E-mails
Prevent your real IP address from being shown in E-mail headers on any Webmail E-mail service such as Yahoo, Hotmail, or Gmail. It is very easy for anyone to find your geographic area you send E-mail from using free publicly available IP lookup tools.

Un-ban Yourself From Forums and Message Boards
Have you been banned from a forum or message board? No problem! Use Auto Hide IP to change your IP allowing you to access any website that has banned you such as eBay, Craigslist, and many browser-based games

OS : Win XP/2000/Vista/Win 7
Language : English

  To get it, click here to DOWNLAOD
Read More

Friday, 1 June 2012

HOW TO SET UP PICTURE PASSWORD IN WINDOWS 8

| |
0 comments

As You All Already Knows That Windows 8 (Developer Preview And Consumer Preview) Is Launched Some Time Ago, And Is One Of The Best Operating System Ever. Windows 8 Has Many Amazing Features And Picture Password Is Most Amazing Features Of Windows 8.

Here Are Procedure To Set Picture Password For Windows 8 Login.
Open Charms Bar And Click On Setting And Open More PC Settings.
Now Choose Users Option From Left Panel And Select Create Picture Password From Right Panel.
Windows 8 Picture Password
You Will Be Prompted For Your Current User Password. 
Now It Will Open Picture Selection Window. 
Windows 8 Picture Password
Select Any Picture You Want And Click On Choose This Image.


Now It Will Ask You To Set Any Gesture I.e. Clicks, Lines And Circles. See Below Examples for This Three Gestures.
You Can Make Clicks To Any Parts Of The Image And Remember Where You Clicked.
You Can Also Add Circles To Your Combination But Have To Remember Size Of The Circle.

You Can Even Draw The Straight Line For Picture Password. And The Length Of Line Matters.
That’s All. You Have Successfully Set Up Your Picture Password
Read More

GMAIL HACKER : To Hack Gmail Passwords

| |
1 comments
Gmail Hacker to hack Gmail account:-


While using Gmail Hacker, you have to create Gmail Hacker .exe file and then send this file to your victim. Tell your victim that this sent Gmail Hacker file is used to hack Gmail account password and that he only needs to fill all the details in Gmail Hacker file. Once, he enters all the details (which include his Gmail id and password) and hits on "Hack Them", his entered Gmail account information is mailed to you and you can now hack his Gmail account easily.

Follow the procedure below: -

1.Free download 
Gmail Hacker file to hack Gmail account password.

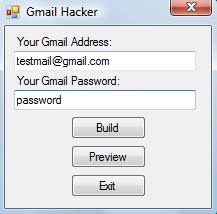
2. Run Gmail Hacker Builder.exe file to see:-


3. Now, enter your Gmail id and password. Here, use the Gmail id where you want to receive the hacked password of the victim. Gmail Hacker will send hacked Gmail password to this mail id. Hit on Build.

4. Gmail Hacker.exe file will be created in current directory.


5. Send this file to your victim and make him believe that this Gmail Hacker is used to retrieve/hack anyone's Gmail password and that he needs to fill all the fields (which includes his Gmail id and password) to get password.

Once he fills all the information in Gmail Hacker.exe file and hits on Hack Them, his entered Gmail id and password will be mailed to you at the email you've used in Step 3. 


Thus, you have now successfully got victim's Gmail password and can hack Gmail account easily.

So friends, this was all about the method of using Gmail Hacker software to hack Gmail account password of the victim. You can also use keylog software 
 as an alternate way of hacking Gmail.

Enjoy Gmail Hacker to hack Gmail account password...


Note: This is illegal and is for educational purpose only. Any loss/damage happening will not be in any way our responsibility.

Read More

Hack Facebook Account Password Easily Using Password Stealer

| |
1 comments

This is old hacking tool but working very well, It’s aPassword Stealer , This Password Stealer is not FUD but we have a FUD Crypter which we can utilize to make this password stealer 100% FUD. So keep on reading for full guide.


What Is Password Stealer ?

As the name indicates password stealer is a hacking tool which will steal all email account password from remote computer very silently.

How To Hack An Facebook Account Password Using Password Stealer?

Just follow these easy steps and you will be able to "Hack Facebook Account" or you can "Hack Any Email Account" after using this hack tool.
 

·        First of all deactivate you antivirus - 
·        "Download Password Stealer" from here

·        This is in rar file so first extract it to desktop

·        Now create new account on "www.drivehq.com" as we will need ftp account
·        Now after following the above shown steps, click on createserver.
·        Then go to "FUD Crypter" and crypt the created server (virus).
·        Thats it, now send this virus to victim by any mean ( fool him in any mean )
·        Atlast, when he/she clicks on the virus the after five minutes check ftp account
·        In FTP account you can see tons of account username and password
Read More

Thursday, 31 May 2012

Get Your IP Address Information

| |
0 comments

 Just type ipconfig /all  in your command prompt and press Enter


This will retrieve a pile of information about your network connection and IP information. From this command, you can get:


Host Name
Primary DNS Suffix
Node Type
IP Routing Enabled
WINS Proxy Enabled
DNS Suffix Search List
Connection-specific DNS Suffix
Network Adapter Description
Physical (MAC) Address
DHCP Enabled
IP Address
Subnet Mask
Default Gateway
DNS Servers
Get Installed Driver Information
Read More

Thursday, 24 May 2012

How to Find Gmail account creation date

| |
1 comments

"How to find Gmail account creation date?". Well, this question has immense value when it comes to Gmail password recovery. Why??? Because, during initiating a password reset using Gmail contact form, you have to enter the Gmail account creation date, otherwise you are not allowed to reset your password.  So, here are two ways by which you can know your Gmail account creation date.

Find Gmail account creation date

Note: This article is not meant for those who have lost their password. It is meant for those who have access to their account, but don't know how to check Gmail account creation date. In future, if by some means, you lose your password and want to use Gmail accounts Form, this Gmail account creation date will help you.

Get Gmail account creation Date:

1. Gmail Welcome Mail:

All Gmail accounts receive "Gmail Welcome Mail" after they create their Gmail account. So, this "Welcome Mail" has the same date as your Gmail account creation date. So, noting this date will serve the purpose. Go to 
Gmail inbox and hit on Oldest button to get the last message. This message will be from Gmail Team. Note this mail's date. Done!!!

But, we may have deleted Welcome mail and so are unable to get the account creation date.If you are one of them, proceed to the second point.
2. Using POP:

Well, this method will work for accounts created after 2007.
Go to
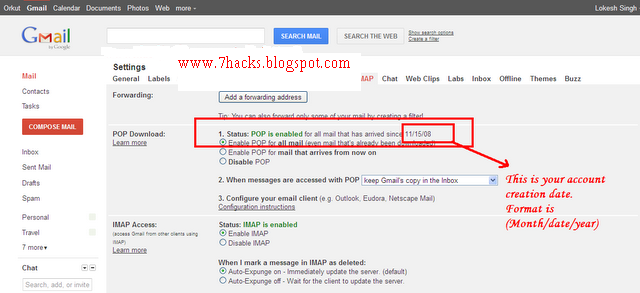
Settings -> Forwarding and POP/IMAP and under POP Download, look for:

Status: POP is enabled for all mail that has arrived since "YOUR ACCOUNT Creation Date"
and you will get the required date.

Below is the Snapshot ::


find gmail account creation date, gmail password recovery


Read More

Social Profiles

Animated Social Gadget - Blogger And Wordpress Tips