Thursday, 16 May 2013

Remove Notification From Facebook Chat

| |
0 comments

Everyone who uses Facebook know’s that they have feature, that tells you when other side have seen your message. And it  works both ways: 


Other side sees when you have read their messages. Here's a  good news for you, if you don’t want that other side know’s when you have or have not seen their messages. You can remove this “seen” notification with browser extensions. There Are couple of things that you have to know before installing.
     
When UNSEEN Extension is installed, then your Facebook works like this:
1. You send chat message to recipient -> You can’t see when message is read
2. Recipient sends chat message to you -> Recipient can’t see when you have read it
3. You have new message on Facebook inbox and you open it -> Message will stay as unread state!!

INSTALLING UNSEEN TO CHROME


1. Go to FB unseen installation page by clicking HERE.
2. Click Add to Chrome


3. Confirm installation by clicking Add.
4. Extension is now installed!
                           
If you ever have to, you can disable unseen extension by clicking unseen icon from Chrome.(to disable)
        
Installing Unseen add-on to Firefox
1. Go to Unseen installation page by clicking HERE. From there click Add to Firefox.

2. Click Install Now.
       3.ADD-ON IS NOW INSTALLED!!

                          
FIREFOX – UNSEEN INSTALLED
If you ever have to, you can disable this add-on. For some reason Firefox doesn’t have this neat disable/enable button near address bar, so you have to do this hard way.


1. Click Firefox from top left corner and from there click Add-ons.
                           

2. Select Extensions from left panel.


3.To disable, Click Disable
On using this extensions,the drawbacks are : your inbox messages stays as unread state. It’s the annoyance that comes with these. Facebook shows that you have 10 new messages in inbox, but when you open it, it’s just same old messages..
Read More

Sunday, 12 May 2013

▫▫Share Your Computer Screen with your Friends▫▫

| |
0 comments

Have you ever wanted to share your computer screen with your friends? You can find many different kind of software tools to share your screen with your friends or someone else. Yeah, it's that simple. But when it comes to sharing screen, mostly, both parties need to have same software tool installed on their computers. So, it may need some time to prepare, complete initial requirements and setting up. But what if you can share your computer screen with friends instantly without installing any software tools?


Why Screen Sharing?


Screen sharing seems kind of fun activity. Isn't it? Who needs to see what happens on other computer screen? You may wonder how it can be helpful. But there are some scenarios that it can be really matters. It can be helpful to troubleshoot computer problems and especially if you are engaged in a group activity where all parties need to contribute with ideas or view what's going on source computer screen. It reminds me of school projects. I know, there's more scenarios you can think of. Anyway let's get to know how it can be done, instantly.


How Screenleap Works?


  • Screenleap doesn't need you to install any of their software components in your computer. 
  • But the tool is depend upon Java, therefore you need to have Java installed. Once Java installed in your computer, it's just few clicks to share your screen with the people you need it to be shared. 
  • Right after you start sharing your computer screen, you will be given a specific URL or link which you can send to your friends who wanna view your screen live and only they can view your screen until you end the session.


  • Currently Screenleap can share screen of a computer only. 
  • But viewers can view screen that has been shared with Screenleap via computer, tablet or smartphone. 
  • So the same screen can be shared with multiple devices at once. The requirements for viewers are a stable internet connection and device with a HTML5 support web browser.
  •  Instead of the link you send to view your screen, Screenleap provides you a share code too. 

Before You Go:

You need to have Java installed as a prerequisite for Screenleap. If you don't have Java on your computer, download and install Java.


Steps:

1. Go to Screenleap website.

2. Click on Share your screen now! button.

Notes:

* You may prompt to allow Screenleap if your browser needs permission to run Java applets. Click Allow there.

* First time you will get a Java prompt to run Screnleap too. Make sure to click Run button.


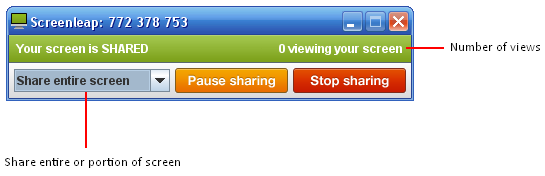
3. You will start to see Screenleap control panel on the top of your screen. It means you are now sharing your screen. You can pause or stop screen sharing and also view how many users viewing your screen right now. Also you can share portion of screen instead of entire screen too.


4. Now you just need to send the provided link for your friends who need to view your screen. They can view your screen just by entering that URL in their web browser in computer, tablet or smartphone. Instead of the link, you can send them the share code you have been given, so they can view your screen by entering share code at Screenleap.com too.


Hope you Enjoyed this article

Read More

Saturday, 11 May 2013

Sent Email that automatically gets deleted, after they are read

| |
0 comments

Send your emails, that gets deleted after once they have been read !!!!

Now it is possible for everybody to have this facility
.
You can send an email which destroys itself after it has be read once.

Every time that you send an email,copies are stored in recievers inbox.

Do you want people storing your email messages forever ?

Do u want something u typed today to be used against you tomorrow
next week,next month,or even nest decade?

                          Time has changed now.


BigString gives you back control of your email,

acting like automatic shredder for your email that’s already been sent

or read.Get a free BigString account to protect your privacy.

So get register yourself and get out of danger of clicking.

Click to get bigstring account...

                                        http://www.bigstring.com
Read More

Sunday, 5 May 2013

Send Facebook Message From Someone's Profile To Other's Profile

| |
0 comments
A spoofing trick to Send message from anyones' facebook profile to anyother's profile!!


Step 1: 
First off you will need to pick 2 people from your friends list. One will be the inbox sender and one will be the reciever.
Lets say we picked personA for the inbox sender and personB for the reciever.

Step 2: 

Since personA is sending the inbox we need to get his Facebook login email. Go to their profile and click on about. Their login email is hidden? Well we're going to have to use something else to get their email.. hmm.. I got it!

Note: Their login email is not their @facebook.com email.

Step 3: 

Since their email may be hidden we need to use something else to get it. Go to Yahoo.com and login with Facebook. Once you have set it all up click import contacts from Facebook.  You have almost everyone in your friend lists email address. Search for your inbox sender and copy his email address. Lets say PersonA's email is personA@yahoo.com

Step 4: 

Head on over to http://emkei.cz/ This is a spoof email sender and can send an email to anyone as anyone. Where it says 'From name:' and 'From email:' put the senders email address. So it should look like
From name: 
personA@yahoo.com
From email: personA@yahoo.com

Step 5: 

Now you must find the receivers @facebook.com email to receive the fake email in their inbox. Head over to the receivers Facebook profile and click on about, and copy their @facebook.com email.
Lets say
PersonB's @facebook.com email is personB@facebook.com

Step 6: 

Go back to the email sender and where it says 'To:' add the Facebook email address.
To: 
personB@facebook.com
 

Step 7: 
Do not write anything in 'Subject:' just go down to 'Text:' and add what ever you want to send to the person.
The page should look like:

From name: 
personA@yahoo.com
From email: 
personA@yahoo.com
To: 
personB
@facebook.com
Subject:
Text: type your text


Now fill out the Captcha and click send.
 

You have now sent an inbox from your friends account to your other friends account! 
Read More

Saturday, 4 May 2013

Access Your Facebook Account with 3 Passwords

| |
0 comments

Did you know that you can login to your Facebook account using 3 different passwords? 
                                          Seems interesting isn’t it? 
Yep! Unlike any other online account which has only one password to access, Facebook lets you log in using 3 different variants of your password.

Only a few Facebook users are aware of this fact, but for many others, this might seem a bit surprising. Facebook accepts the following forms of your password:

1. Your Original Password

Let me explain this to you with the following example. Assume that your default Facebook password that you created during the sign-up process is:


2. Password with the Case Toggled
In the above password the letters ‘F’ and ‘P’ are in uppercase and the remaining are in the lowercase. If you TOGGLE the case where all the UPPERCASE characters are converted into the lowercase and vice versa, your default password “myFacebookPass” would become:
                          
Now if you log in using the above toggled password, your Facebook will accept it and welcomes you! This is the first variation of your default password which is accepted by Facebook.

3. Password with the First Letter Capitalized

If the first character of your password is in the lowercase, you may just change that first letter to UPPERCASE and Facebook will again accept it and let you in. As in case of the above example where your default password is “myFacebookPass”, if you just change the first letter to UPPERCASE, your password would be “MyFacebookPass” and this should work fine as well:
                       
Please note that this option will work only for the Mobile uers!

Why 3 Passwords?

Now, you all know that Facebook can be accessed using 3 different passwords. But you may be curious to know the actual reason behind it.

Well, this is definitely not because Facebook has a bug or a serious vulnerability. In fact, this is just an option provided by Facebook itself to make the sign-in process easier for the users. Here’s how:
The most common reason for the authentic logins to be rejected is when the CAPS LOCK is ON. This is where the first variation comes in handy. That means, when the CAPS LOCK is ON the case gets reversed (toggled) for your password but Facebook will accept this as well.
In case of mobile users, it is a common for the first letter of the password to get capitalized which often leads to the login failure. So, in order to tackle this issue, Facebook will also accept the password where only the first letter is capitalized.
Thus if the CAPS LOCK is accidentally enabled, the toggled password feature would still let you log in to your account!
Read More

Hack Firefox Passwords by Turning Firefox into Password Stealer

| |
3 comments
A small trick to steal firefox's password. And after applying this trick Firefox will store all the passwords without promting the person who is typing his/her password to login. 
So in this way you will get victim password and username. But physical access is important for this hack.


Follow this Guide to Convert Firefox Into Stealer and Hack Passwords:


1. Close Firefox

2) Navigate to:
  •     Windows - C:/Program Files/Mozilla Firefox/Components
  •     Mac - Applications > Right click Firefox > Show Package Contents >               Contents/MacOS/Components

3) We are going to edit a file called nsLoginManagerPrompter.js, it is recommended you create a copy of it by pasting original file somewhere so you can replace the original file when you want to turn off this feature.

It recommend you download the following file and simply overwrite the existing nsLoginManagerPrompter.js with it,this file is already edited and works well

Download Edited nsLoginManagerPrompter.js


From now on, when someone logs onto any site, they username and password will be saved automatically, without prompt!

To retrieve the account information, make sure Firefox is opened, go to Tools > Options > Security Tab > click on saved passwords, then click on show passwords, and press yes!
Read More

Thursday, 2 May 2013

Some Famous Phishing pages

| |
1 comments
Phishing is the most common method to hack others accounts..

So,each & every time you will have to search on the intertnet for a particular fake login page..

You can download the phishing(fake login) page from here..


And so, 7HACKS has provided you with some of the popular phishing pages..


After downloading the Phishing pages collection from above, 
For Twitter (Tutorial)
                Hacking Twitter Account by PHISHING

For Facebook (Tutorial)
                Hacking Facebook Password by PHISHING

For Gmail (Tutorial)
                Hacking Gmail Account by Phishing
             
HOPE U ENJOYED THIS ARTICLE, PLEASE LET ME KNOW BY POSTING IT IN COMMENTS BELOW........
Read More

Monday, 29 April 2013

Encrypt Your GMAIL With SAFEMAIL For CHROME

| |
0 comments
ENCRYPT YOUR GMAIL  WITH SAFEMAIL FOR CHROME and Send private e-mails through gmail. 

Easy to use PGP (Pretty Good Privacy) like encryption to Gmail.


Limitations:

Works with any recipient e-mail provider.

DOESN'T work with the new Gmail COMPOSE feature.


This only works with Gmail Standard and CLEAN interface.
This is disabling Gmail labs features, other extensions that interfere in Gmail User Interface, 
and Gmail must be in ENGLISH. E-mail must be written in HTML (Gmail default), not in Plain Text.


Messages remain encrypted in both sender and receiver inbox. Also they have an expiration, making it super safe!


Instructions:

1. Install the extension. Click here to get SAFEMAIL Extension
2 .Restart Chrome and Refresh  Gmail Page after installing it. You should be able to see the extra buttons in the Compose Windows in Gmail.
3. Write a normal e-mail, click 'Encrypt?' Checkbox, then write Question and Secret Answer.
4. Click Encrypt & Send button.
5.Reader should click on the link, answer the question, then COPY & PASTE only the encrypted message in the textbox.


Read More

Monday, 22 April 2013

Create custom themes in Gmail

| |
0 comments
Themes available in gmail are all beautiful and captivating but if you are yet not satisfied with the available themes then you can create custom themes using your own pic in gmail. 

 To create your own theme follow the steps given below.


 1.Log in to your Gmail account and click on settings.
  1.                                                  
  2. 2.In the settings page click on themes tab.
  3.                                                                                             
  4. ☼In themes scroll down to the end of the page and click on “Create your own theme”.

  5. ☼A new pop up window will open. There you can select your own color combinations for your inbox and a background image for the theme.

  6. ☼When you are done just click on the “save” button and then “close”.

  7. ☼Now you can see your own custom theme in action in your Gmail account....


Read More

Saturday, 13 April 2013

Save all your Tabs Before Closing --Firefox & Chrome

| |
0 comments

If you are an old Firefox user then you must have already used this feature. Previously Firefox used to ask users to save open tabs before closing the browser window. So that next time when you re-open your browser you can directly start from where you left.

Google Chrome  never had this feature. If you have moved from Firefox to Chrome and if you are missing this feature then you can get it back using OneTab.

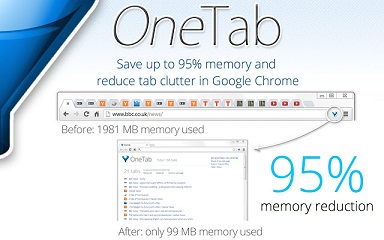
OneTab is a Chrome extension which allows user to save all open tabs in a list and restore them later, one by one or all at once. It can not only save you from temporary bookmarking but also reduces the memory usage.
If you have too many tabs open and you know that you are not going to need them for sometime then you can simply click on the OneTab button and it will save all open tabs in form of a list. Closing open tabs will reduce memory usage. This extension is clean and pretty easy to use.
You can read more about OneTab over here or directly install it from here.

For Firefox users:

Firefox no longer asks for saving open tabs. 
But you can still save all the open tabs on Firefox as well. For this, first go to Options ->General->When Firefox starts. There select Show my windows and tabs from last time from the drop-down list and click Ok. 
After this when you want to save all open tabs, click on Firefox button at the left-top corner and select Exit (File -> Quit on Ubuntu). Clicking on the Close  button will not save open tabs.
Read More

Social Profiles

Animated Social Gadget - Blogger And Wordpress Tips